longhorn installation
Table of Content
longhorn installation
Longhorn is a powerful, lightweight, and easy-to-use distributed block storage system designed specifically for Kubernetes. Built to deliver high availability, reliability, and performance, Longhorn simplifies the complexities of persistent storage in cloud-native environments. It seamlessly integrates with Kubernetes to provide persistent volumes that are resilient to node failures, making it an ideal solution for running stateful applications in production. With features like snapshot, backup, and volume cloning, Longhorn offers enterprise-grade capabilities while remaining open-source and developer-friendly.
environment check script
There is an environment check script you can run to check if something is missing in your environment to run longhorn.
In my case, the script gave me three issues:
- kernel module iscsi_tcp missing
- cryptsetup package missing
- warning in regard with multipathd on Ubuntu hosts
$ curl -sSfL https://raw.githubusercontent.com/longhorn/longhorn/v1.8.1/scripts/environment_check.sh | bash
[INFO]  Required dependencies 'kubectl jq mktemp sort printf' are installed.
[INFO]  All nodes have unique hostnames.
[INFO]  Waiting for longhorn-environment-check pods to become ready (0/0)...
[INFO]  Waiting for longhorn-environment-check pods to become ready (0/6)...
[INFO]  All longhorn-environment-check pods are ready (6/6).
[INFO]  MountPropagation is enabled
[INFO]  Checking kernel release...
[INFO]  Checking iscsid...
[ERROR] kernel module iscsi_tcp is not enabled on lab-cp3
[ERROR] kernel module iscsi_tcp is not enabled on lab-cp1
[ERROR] kernel module iscsi_tcp is not enabled on lab-worker2
[ERROR] kernel module iscsi_tcp is not enabled on lab-worker1
[ERROR] kernel module iscsi_tcp is not enabled on lab-cp2
[ERROR] kernel module iscsi_tcp is not enabled on lab-worker3
[INFO]  Checking multipathd...
[WARN]  multipathd is running on lab-cp3 known to have a breakage that affects Longhorn.  See description and solution at https://longhorn.io/kb/troubleshooting-volume-with-multipath
[INFO]  Checking packages...
[ERROR] cryptsetup is not found in lab-cp1.
[ERROR] cryptsetup is not found in lab-worker2.
[ERROR] cryptsetup is not found in lab-worker1.
[ERROR] cryptsetup is not found in lab-cp2.
[ERROR] cryptsetup is not found in lab-worker3.
[INFO]  Checking nfs client...
[INFO]  Cleaning up longhorn-environment-check pods...
[INFO]  Cleanup completed.
multipathd remed on lab-cp3
Add this block in /etc/multipath.conf and restart the service by running sudo systemctl restart multipathd.service.
cryptsetup package
Install using package manager (apt or dnf).
kernel modules
Create a file /etc/modules-load.d/longhorn-requirements.conf, add lines below, and reboot the system.
Here I am adding dm_crypt as well. It's because the longhorn node description was showing the warning that this module is missing when I was checking each node on Longhorn UI.
other optional requirement for great performance using experimental feature
These are for Longhorn V2 Data Engine utilizing SPDK, Storage Performance Developer Kit, to use "block" disk type which is the experimental feature as of April 2025, and is resource intensive (local nvme disk, 1 dedicated CPU, 2G memory for 1024 huge page, and so on). I will be skipping it and stick with the file system disk type this time, but here is the list of requirements.
- SSE4.2 instruction set support
grep sse4_2 /proc/cpuinfo
- 5.19 or later is required for NVMe over TCP support
- v6.7 or later is recommended for improved system stability
- linux kernel modules
- vfio_pci
- uio_pci_generic
- nvme-tcp
- Huge page support, 2 GiB of 2 MiB-sized pages
Longhorn installation
I am skipping some detailed steps, but here is the list of what I am going to do:
- create longhorn-system namespace
- identify the helm chart version I want to use
- download the values file to my GitOps repository and edit
- create flux HelmRepository and HelmRelease manifests and include it in the existing infra-controllers flux kustomization
Creating longhorn-system namespace
I like to manage the namespace manifest independent from helm releases, so I am adding the namespace manifest in my flux-system kustomization.
I will be using Cilium gateway to access the Longhorn UI, so I have added the gateway label which allows the HTTPRoute in this namespace to use the gateway.
# ./clusters/lab-hlv3/namespaces/longhorn-system.yaml
---
kind: Namespace
apiVersion: v1
metadata:
  name: longhorn-system
  labels:
    service: longhorn
    type: infrastructure
    gateway: cilium
Longhorn helm chart and values
Let's add the helm repository storing Longhorn and find the available version.
helm repo add longhorn https://charts.longhorn.io
helm search repo longhorn
# helm repo update

# store values file locally
helm show values --version 1.8.1 longhorn/longhorn > longhorn-1.8.1-values.yaml
Changes made to the values file
- image registry to use local harbor
- longhorn ui replica count from 2 to 1
- persistence settings
- default class replica count from 3 to 2
- data locality setting from disabled to best-effort
Flux helmrepo and helmrelease for longhorn
Here I am skipping the details, but I have prepared a shell script to generate flux helmrepo and helmrelease manifests using the modified values file, and I have added the product file to the infra-controllers kustomization. Please see the similar example done when installing cert-manager.
Longhorn installation result
Many microservices spin up, run, and disappear during the installation. In case on my lab VMs running on Hyper-V and Proxmox, it took around 20 minutes to complete.
Here is the part of flux tree output, just on the longhorn HelmRepository and HelmRelease.
$ flux tree ks infra-controllers
Kustomization/flux-system/infra-controllers
├── HelmRelease/flux-system/longhorn
│   ├── PriorityClass/longhorn-critical
│   ├── ServiceAccount/longhorn-system/longhorn-service-account
│   ├── ServiceAccount/longhorn-system/longhorn-ui-service-account
│   ├── ServiceAccount/longhorn-system/longhorn-support-bundle
│   ├── ConfigMap/longhorn-system/longhorn-default-resource
│   ├── ConfigMap/longhorn-system/longhorn-default-setting
│   ├── ConfigMap/longhorn-system/longhorn-storageclass
│   ├── CustomResourceDefinition/backingimagedatasources.longhorn.io
│   ├── CustomResourceDefinition/backingimagemanagers.longhorn.io
│   ├── CustomResourceDefinition/backingimages.longhorn.io
│   ├── CustomResourceDefinition/backupbackingimages.longhorn.io
│   ├── CustomResourceDefinition/backups.longhorn.io
│   ├── CustomResourceDefinition/backuptargets.longhorn.io
│   ├── CustomResourceDefinition/backupvolumes.longhorn.io
│   ├── CustomResourceDefinition/engineimages.longhorn.io
│   ├── CustomResourceDefinition/engines.longhorn.io
│   ├── CustomResourceDefinition/instancemanagers.longhorn.io
│   ├── CustomResourceDefinition/nodes.longhorn.io
│   ├── CustomResourceDefinition/orphans.longhorn.io
│   ├── CustomResourceDefinition/recurringjobs.longhorn.io
│   ├── CustomResourceDefinition/replicas.longhorn.io
│   ├── CustomResourceDefinition/settings.longhorn.io
│   ├── CustomResourceDefinition/sharemanagers.longhorn.io
│   ├── CustomResourceDefinition/snapshots.longhorn.io
│   ├── CustomResourceDefinition/supportbundles.longhorn.io
│   ├── CustomResourceDefinition/systembackups.longhorn.io
│   ├── CustomResourceDefinition/systemrestores.longhorn.io
│   ├── CustomResourceDefinition/volumeattachments.longhorn.io
│   ├── CustomResourceDefinition/volumes.longhorn.io
│   ├── ClusterRole/longhorn-role
│   ├── ClusterRoleBinding/longhorn-bind
│   ├── ClusterRoleBinding/longhorn-support-bundle
│   ├── Service/longhorn-system/longhorn-backend
│   ├── Service/longhorn-system/longhorn-frontend
│   ├── Service/longhorn-system/longhorn-conversion-webhook
│   ├── Service/longhorn-system/longhorn-admission-webhook
│   ├── Service/longhorn-system/longhorn-recovery-backend
│   ├── DaemonSet/longhorn-system/longhorn-manager
│   ├── Deployment/longhorn-system/longhorn-driver-deployer
│   └── Deployment/longhorn-system/longhorn-ui
└── HelmRepository/flux-system/longhorn
Access to Longhorn UI
The pod and service for longhorn web frontend are created as part of the helm chart installation. Let's configure the gateway and add HTTPRoute to enable web access to the Longhorn UI.
$ kubectl get svc longhorn-frontend -n longhorn-system
NAME                TYPE        CLUSTER-IP      EXTERNAL-IP   PORT(S)   AGE
longhorn-frontend   ClusterIP   10.96.107.178   <none>        80/TCP    23h
Cilium gateway
Here is the updated gateway manifest. Once this change is pushed, the gateway spins up the new listener for longhorn.lab.blink-1x52.net and cert-manager prepares the TLS certificate.
# ./infrastructure/lab-hlv3/configs/cilium/gateway.yaml
---
apiVersion: gateway.networking.k8s.io/v1
kind: Gateway
metadata:
  name: cilium-gateway
  namespace: gateway
  annotations:
    cert-manager.io/issuer: issuer
spec:
  gatewayClassName: cilium
  addresses:
    - type: IPAddress
      value: 192.168.1.79
  listeners:
    - name: whoami-kube-http
      hostname: whoami-kube.lab.blink-1x52.net
      port: 80
      protocol: HTTP
      allowedRoutes:
        namespaces:
          from: Selector
          selector:
            matchLabels:
              gateway: cilium

    - name: whoami-kube-https
      hostname: whoami-kube.lab.blink-1x52.net
      port: 443
      protocol: HTTPS
      allowedRoutes:
        namespaces:
          from: Selector
          selector:
            matchLabels:
              gateway: cilium
      tls:
        mode: Terminate
        certificateRefs:
          - name: tls-whoami-kube
            kind: Secret
            namespace: gateway

    - name: longhorn-https
      hostname: longhorn.lab.blink-1x52.net
      port: 443
      protocol: HTTPS
      allowedRoutes:
        namespaces:
          from: Selector
          selector:
            matchLabels:
              gateway: cilium
      tls:
        mode: Terminate
        certificateRefs:
          - name: tls-longhorn
            kind: Secret
            namespace: gateway
HTTPRoute
And here is the HTTPRoute to connect the longhorn-https listener and longhorn-frontend service.
# ./infrastructure/lab-hlv3/configs/longhorn/httproutes.yaml
---
apiVersion: gateway.networking.k8s.io/v1beta1
kind: HTTPRoute
metadata:
  name: longhorn-https
  namespace: longhorn-system
spec:
  parentRefs:
    - name: cilium-gateway
      sectionName: longhorn-https
      namespace: gateway
  hostnames:
    - "longhorn.lab.blink-1x52.net"
  rules:
    - matches:
        - path:
            type: PathPrefix
            value: /
      backendRefs:
        - name: longhorn-frontend
          port: 80
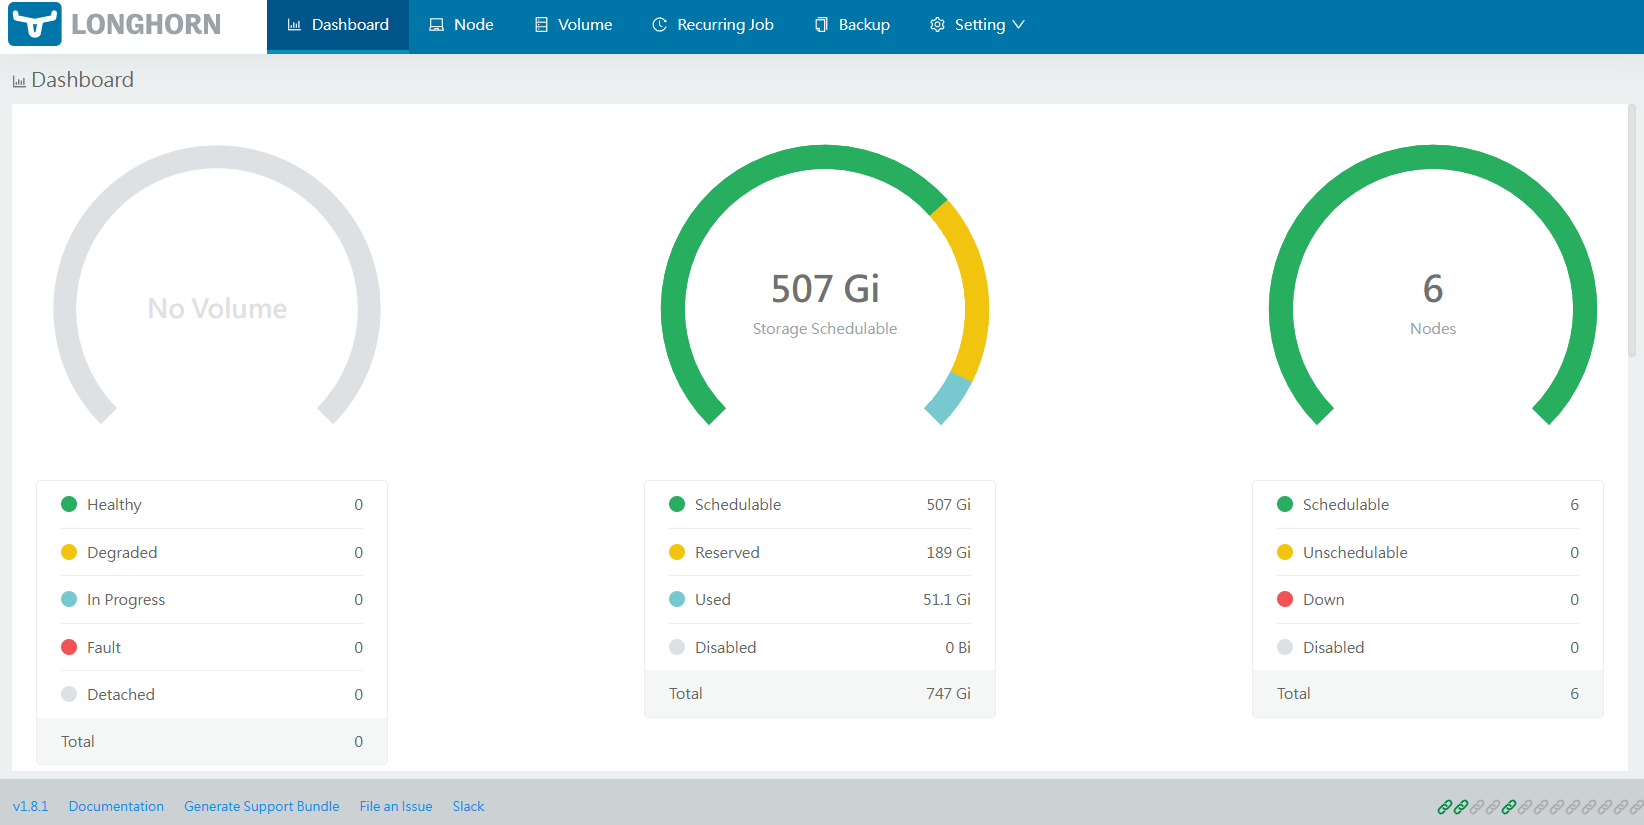
Longhorn UI and Disks
You can check nodes and disks on the UI. By default, or by how I configured values file and installed Longhorn, the longhorn system is reserving some space for system and making the rest as scheduled, ready to serve.
Next I am going to add additional 80GB disk formatted in xfs filesystem to two worker nodes, lab-worker2 and lab-worker3. I will be keeping the root filesystem disk space untouched as for the time being.
Expanding the disk space on lab-cp2 running Rocky Linux
I found the node lab-cp2 showing warning on Longhorn UI that it does not have any disk space. I learnt that the disk resizing done on Proxmox using qm command did make the disk space bigger, but Rocky Linux cloud-init template image did not use the expanded disk space.
# inside the VM...
sudo lsblk
# partition unused disk space
sudo fdisk /dev/sda
sudo lsblk -f
# /dev/sda5 was created

# create new physical volume using this available disk partition
sudo pvcreate /dev/sda5

# identify existing volume group name
sudo vgs
# add the pv to the existing vg
sudo vgextend rocky /dev/sda5
sudo vgdisplay # to confirm the added free space

# identify target lvm and expand
sudo lvs
sudo lvextend -l +100%FREE /dev/rocky/lvroot
# resize the xfs filesystem
sudo xfs_growfs /dev/rocky/lvroot
df -h
Adding disk on lab-worker2, VM running on Hyper-V
Here are the steps:
- create a new virtual disk
- look for the available iscsi controller to connect to on the target VM
- create a new iscsi controller if needed
- add the disk to the VM
The operations done using powershell are as shown below.
# create a new vhdx
New-VHD -Path "F:\hyperv\vhd\lab-worker2-disk2.vhdx" -SizeBytes 80GB -Dynamic

# confirm the existing disks connected
Get-VMHardDiskDrive -VMName lab-worker2 -ControllerType SCSI

# confirm the controllers
# there should be a couple for disks and DVD drive
Get-VMScsiController -VMName lab-worker2

# add one controller
# and confirm the controller ID newly created and open for the new disk connection
Add-VMScsiController -VMName lab-worker2
Get-VMScsiController -VMName lab-worker2

# add the newly created vhdx to the VM using the available controller
Add-VMHardDiskDrive -VMName lab-worker2 -ControllerType SCSI -ControllerNumber 2 -Path "F:\hyperv\vhd\lab-worker2-disk2.vhdx"
Here is the steps done on the VM host:
- create a new partition
- make it ext4
- mount it
# identify the device
sudo fdisk -l

# assuming the newly attached disk is on /dev/sda
sudo fdisk /dev/sda

# on fdisk menu,
# "p" to print existing partitions
# "d" to delete if there is any existing one
# "n" to create new partition, create "p" primary, one big partition
# and then "w" to write the change and exit fdisk

# confirm the result and should see /dev/sda1
sudo fdisk -l

# format /dev/sda1
# sudo mkfs.ext4 /dev/sda1
# update: go with xfs as that's the recommended filesystem for Minio S3
# sudo apt install xfsprogs  # if mkfs.xfs command is missing
sudo mkfs.xfs /dev/sda1

# confirm UUID of the formatted disk space
sudo blkid

# prepare directory to mount this new disk
sudo mkdir -p /mnt/disk2
Edit fstab file to add one line below to set automatic disk mount.
Verify the result and then reboot to ensure the new disk is properly mounted even after machine reboot.
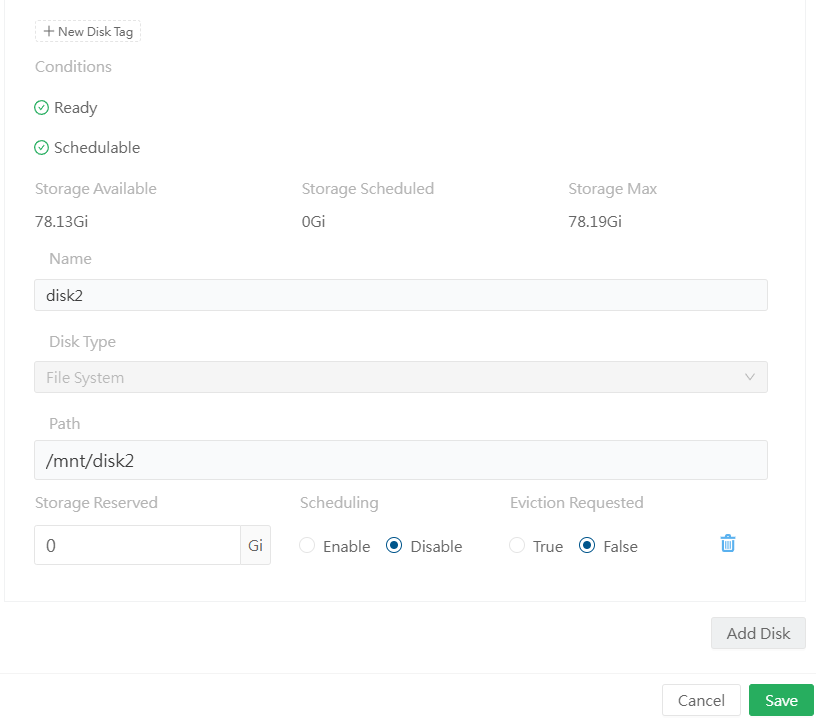
And once I have the new file system ready to use on longhorn, I navigate to the node menu and add the disk.
Adding disk on lab-worker3, VM running on Proxmox
I want to add another 80GB on this VM running on Proxmox.
# shutdown the target VM
# on this VM) sudo systemctl poweroff, or sudo shutdown -h now
# or on proxmox) qm stop VMID

export VMID=1234 # VM ID

# see the status of each available storage on proxmox ve
pvesm status

# list the disks on specific storage
pvesm list local-lvm

# create and allocate 80GB disk
pvesm alloc local-lvm $VMID vm-$VMID-disk2 80G

# confirm vm config
qm config $VMID

# attach the created disk at scsi1
qm set $VMID --scsi1 local-lvm:vm-$VMID-disk2

# verify and start the VM
pvesm list local-lvm
qm config $VMID
qm start $VMID
And do the same for the other VM to create partition, format it, mount it, and add the new disk for longhorn to use.
Adding the new disk to longhorn
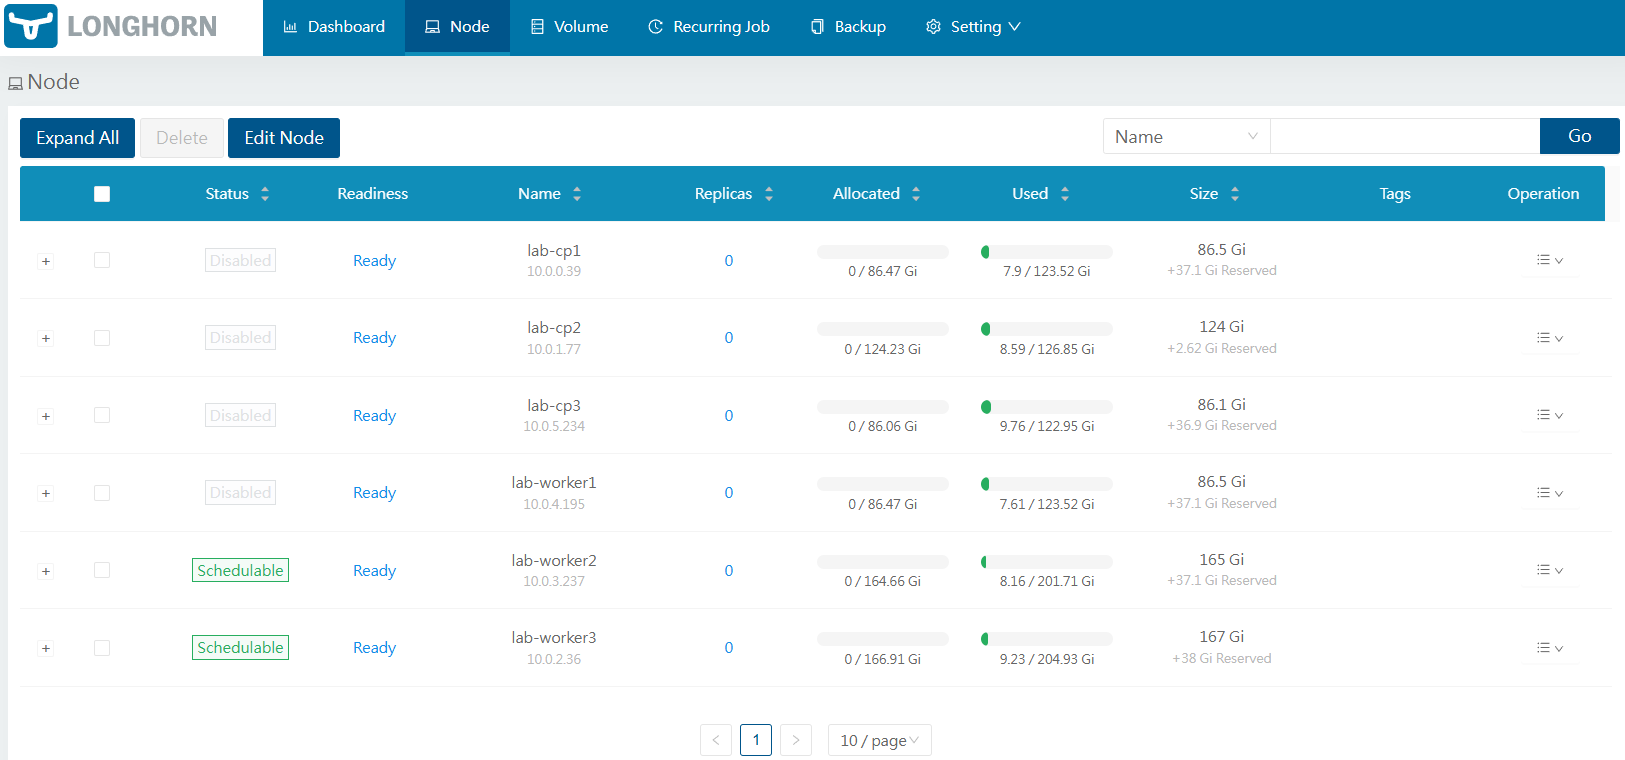
I have added /mnt/disk2 on lab-worker2 and lab-worker3 node.
I have also disabled the control plane nodes and root disk on worker nodes, so the remaining disks available for scheduling are the ones I just added, giving me approx 160GB disk space to use.
Test PVC
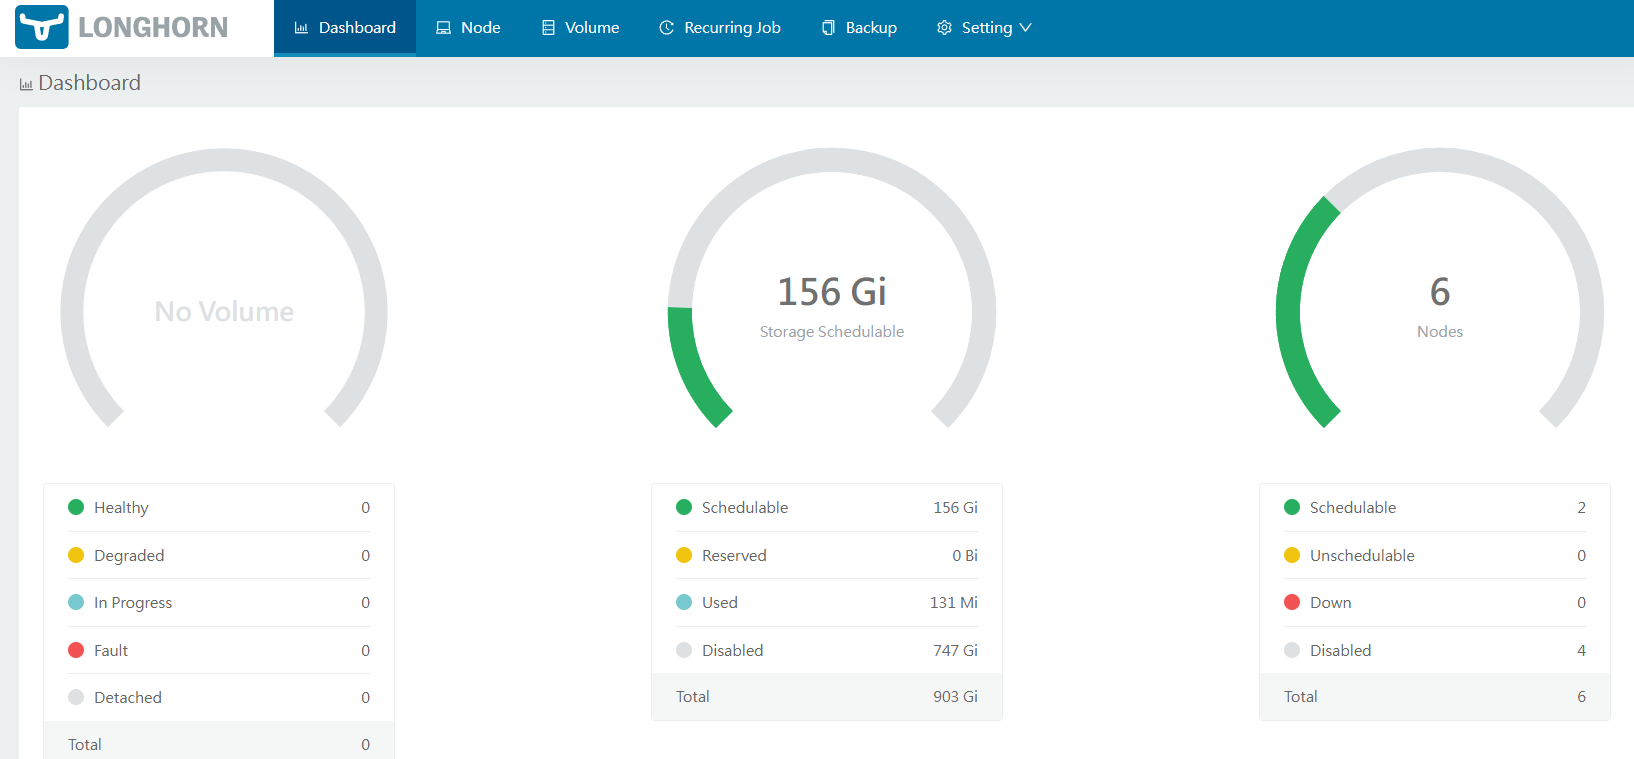
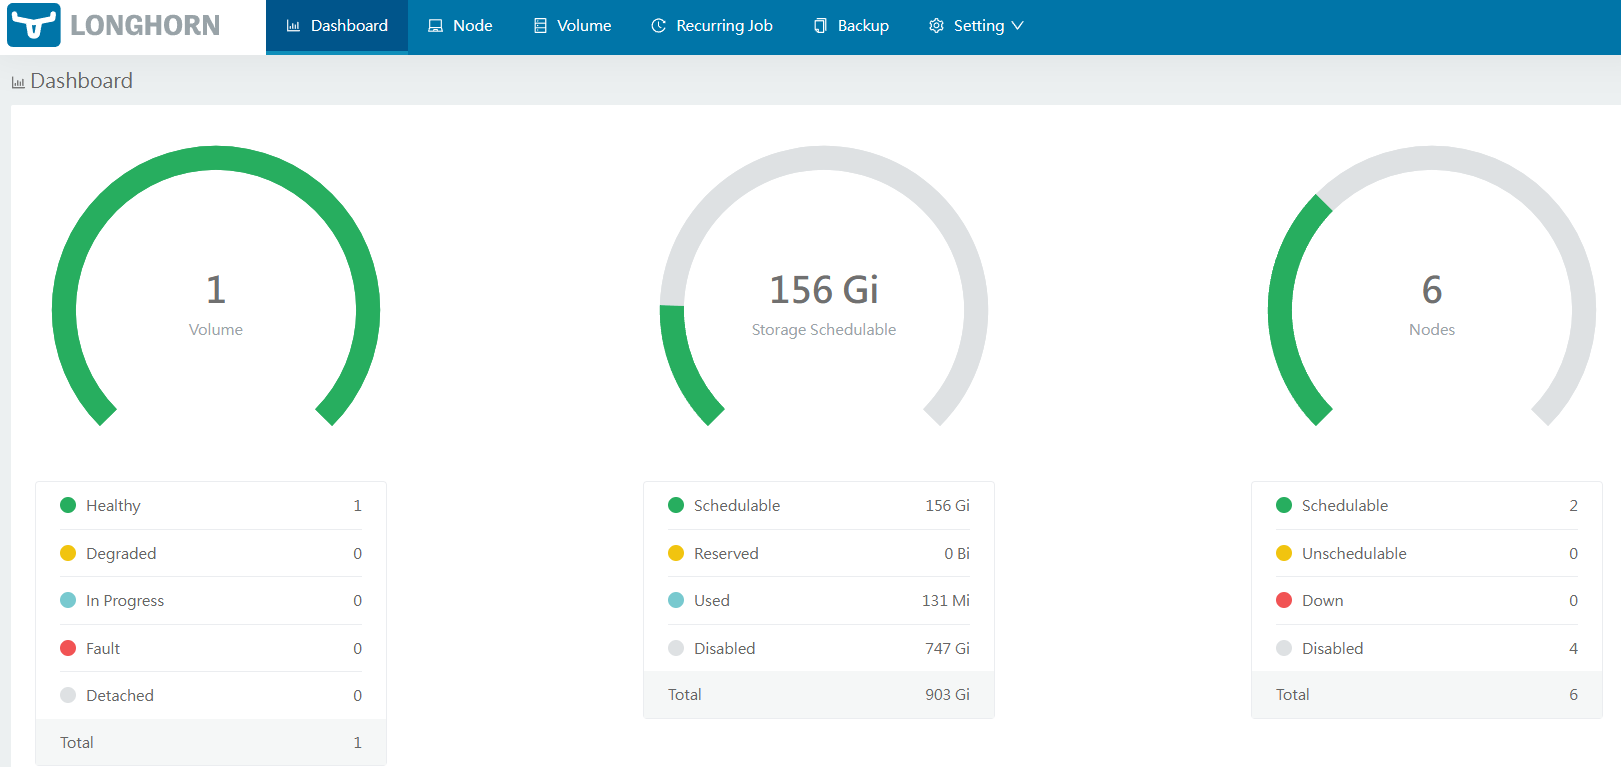
Here is the condition since I have disabled all available nodes and disks except for the two newly added ones on lab-worker2 and lab-worker3.
- there are 156 Gi schedulable storage
- there are 2 nodes with schedulable storage
This is my test deployment, service, and persistent volume claim, pvc:
- service to access nginx
- deploy 1 replica of nginx
- mount longhorn volume at /usr/share/nginx/html
- recreate strategy type set so that whenever this deployment needs to restart, there will be downtime and a time when the available pod is zero
- pvc requesting 1Gi from "longhorn" storageclass
Once this is pushed and reconciliated by fluxcd, the persistent volume is created for the pvc requested. The pod was created on lab-worker2 and so is the volume. This is due to the data locality option set in the helm values file used to install longhorn.
$ kubectl -n longhorn-system get pods -o wide | grep test
my-longhorn-test-676d6b57dc-gzqtc                   1/1     Running   0                3m40s   10.0.3.202   lab-worker2   <none>           <none>
When I add nodeSelector to choose lab-worker1 to the deployment, the pod running on lab-worker2 gets destroyed, the pvc stays, the new pod gets created on lab-worker1, and the same pvc attaches to the pod now running on lab-worker1.
I was able to edit the file on the pod when running on lab-worker2, and then on lab-worker1 as well. Below is the curl command output.
# edit /usr/share/nginx/html/index.html on the pod running on lab-worker2
$ kubectl exec deploy/tools -n testbed -- curl http://longhorn-test.longhorn-system.svc.lab.blink-1x52.net
  % Total    % Received % Xferd  Average Speed   Time    Time     Time  Current
                                 Dload  Upload   Total   Spent    Left  Speed
100    50  100    50    0     0  21758      0 --:--:-- --:--:-- --:--:-- 50000
<html>
<body>
<h1>hi, world.</h1>
</body>
</html>

# nodeSelector lab-worker1 added to the deployment, pod gets re-created

# edit /usr/share/nginx/html/index.html on the pod running on lab-worker1
$ kubectl exec deploy/tools -n testbed -- curl http://longhorn-test.longhorn-system.svc.lab.blink-1x52.net
  % Total    % Received % Xferd  Average Speed   Time    Time     Time  Current
                                 Dload  Upload   Total   Spent    Left  Speed
100    76  100    76    0     0  30170      0 --:--:-- --:--:-- --:--:-- 38000
<html>
<body>
<h1>hi, world.</h1>
<h2>hi, world at h2.</h2>
</body>
</html>
Captures below are for the volume when the pod was running on lab-worker2, and then on lab-worker1 showing warnings on the data locality but functional.


Closing
All looks good! Next up, I will be adding monitoring service which will definitely require disks to store data, and then setup S3 service and logging system which will use the S3 storage service to store log data.